In this article, I will be covering what I feel are the important parts of cast and drift fishing. Otherwise, this could be a 300-page book – and still may not cover it all.
Before we get started I would like to mention a few things. The vast majority of our fishing time is spent trolling. It fits the clients’ needs better in most cases. We don’t recommend casting for inexperienced groups.
As far as fishing goes I personally consider myself an apprentice. Even more so on this particular topic. We’re always trying to learn new things in trying to be a better walleye fisherman. In my claim to not knowing everything, I hereby reserve the right to be wrong.
Drifting
Drifting is a very basic concept. You need to find fish to target, then run into the wind until you have reached the edge of the school or the end of a reef you intend to fish. Shut the boat down and let the wind and waves push you back over the area you want to cover. You want the boat to drift sideways. Try to get the wind blowing onto the port side. Most outboard and I/O boat configurations do best with the motor or outdrive turned all the way to port. That should keep you drifting sideways. Every boat drifts a little differently.
Inboard boats do have an advantage here with a low and centralized center of gravity, they don’t rock and roll nearly as much as a lot of other boats. They seem to drift sideways regardless of the steering wheel position. One thing they can do is change course slightly while drifting. Say you have a west wind, and your setup with the wind on your port side and moving to the starboard side. In this scenario, the bow would be pointed north and the stern south. Turn the rudder to the starboard and the boat will slowly move southeast as it drifts, and to port it will go northeast.
This is very helpful if you’re in a pack of boats, keeping distance from slower moving boats, or to fine tune the drift to target a certain area.
Ideal drift speeds can vary based on the type of fishing you’re doing. While trolling for steelhead we often catch walleye. The speeds we run often exceed 3-mph. Don’t be afraid to allow the boat to drift fast, just know that you will need more weight to get down to the fish.
All boats are different. On windy days it might be necessary to use drift bags to slow your boat down. Some days the fish are just not willing to chase a fast-moving lure. This is all just trial and error and fishing the conditions you are dealt.
On days when the wind is hardly blowing, it might be necessary to go to lighter weights and reel faster to make up for the lack of drift speed.
Casting
Casting or cast and drift fishing can be a fun way to put a limit of walleyes in the boat. In fact, I get much more enjoyment fishing this way than trolling. For this style of fishing I like to use a 6 1/2 ft. rod with a medium or medium light action. There are hundreds of options as far as rods and reels go. A good bang for your buck is the Pflueger President series.
There is much debate on what line is best. I like to use a light, braided line 10 to 12lb. test with a mono leader. It offers much better sensitivity and with its lower diameter, it falls faster too. There is more to having a successful day fishing this way, than just simply casting out a lure and allowing the boat to pull it along as it drifts.
Walleye are much more likely to strike a bait when it’s just slightly above them. The general rule is a 3/4-oz. weight will sink at a rate of about 1.5 feet per second. If you want you can start by giving yourself a baseline. Make a short cast perpendicular to the wind count from the time your lure hits the water until it reaches the bottom then do the math.
 We are not building rocket ships here, we just want a repeatable method we can use to keep our baits in the same area of the water column. Using your sonar as a reference, look to see how far down the majority of the fish are suspended. With some simple math we can get a starting point. For example, let’s say you’re in 30 ft. of water the fish are marking at 15 ft. down. Using a 3/4 oz. weight, we would want to start with a 10-second count down (10-count). Cast out and when the lure hits the water – start counting (one thousand, two thousand, etc).
When you get the desired number (10) start reeling at a steady pace just fast enough to get the blade spinning. It is absolutely imperative to pay attention. Treat every cast as if it was within inches of a trophy walleye. With about every tenth cast, add or subtract a few seconds off your count. Keep changing the count until you get a willing participant to latch on.
With all the excitement of the first fish, it’s easy to forget where you were on your count when you caught the fish. You don’t want to have to start over, so pay attention until you have it dialed in.
Walleyes are much less likely to strike a lure that is just swimming in a straight line at a constant speed.
When you’re fishing from the center of the boat, changing your retrieve speed is about all you can do. Try to vary the speed of the bait by keeping a constant reeling speed, but pulling the rod tip to one side in a sweeping motion thus pulling the bait along much faster. Keep reeling, but slowly move the rod tip back pointing it back at the bait. Once you’re pointed at the bait give it another long sweeping pull to the side.
This can also be done in a vertical motion allowing for more change in depth. This motion should feel somewhat like you’re picking up your coffee off the table, taking a drink, and setting it back down, slowly. At no point should you allow slack in the line even as you’re letting your rod tip back down. Try both, as sometimes one is working better than another. If the boat is drifting fast enough it may not even be necessary to reel at all.
This next tactic is simple but extremely effective. If you are fortunate enough to be at the bow or stern of the boat, you have the advantage. The boat should be drifting along sideways. Wind and waves hitting the port side pushing the boat to starboard.
Let’s assume you’re lucky enough to fish from the bow. You want to cast upwind at about a 45-degree angle, as soon as the bait hits the water close the bail on your reel. Quickly reel up just enough to keep a very slight tension on the line – just enough to keep in contact with the lure. Often fish will hit the bait on the fall.
Start your count and when it’s time to start reeling just reel fast enough to get the blade spinning, it should feel like it’s thumping. As the boat starts to get past the lure it will start changing the direction the lure is headed in. Your lure will basically make a turn as the boat starts pulling it along. You should feel the speed of the blade starting to increase. Your reeling speed starts to be coupled with the boat’s speed as it gets further and further into the turn or “the swing”.
At this point, you can try a few different things. You can slow down reeling to keep the speed consistent, or you can continue allowing the bait to race. I like to give a swift snap of the rod right at the peak of the swing, making the bait dart. Then a pause to let the lure free fall for just a second then back to reeling. The takeaway here is to keep trying different things as you go until the fish tell you what they want. Just be sure you’re paying attention so you can repeat it over and over until your cooler is full.
Let’s talk about the lures we use.
 To be honest there are a ton of different lures out there, but for the most part they all do the same thing. The main ones are: weapons and weight-forward spinners. They are the exact same thing – only totally different.
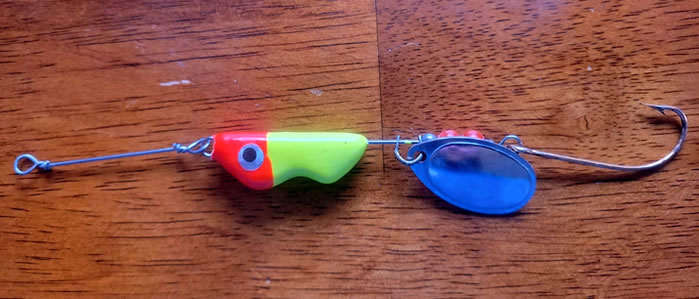
Weight forward spinners are pre-configured and have the weight built right into a complete package. Just add a bit of crawler and you’re ready to go. The advantages are they use steel wire as the main line and the spinner spins on a clevis, mounted to the steel wire. They don’t typically fail due to the clevis spinning and as long as they are kept free of rusting they can last forever. The downside to them is that you need to have tons of them to cover all the different weights and color configurations you might want.
With the weapons, however, you can have just a few and cover just about every weight and color combination you could ask for.
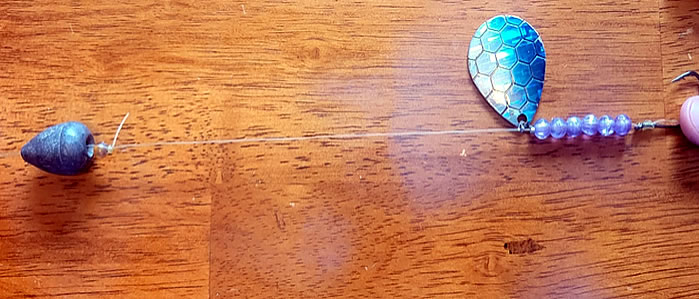
If choosing to tie your own, you can use a quick change clevis that allows you to change to blades in seconds. You can change the color and blade profile (Colorado, Indiana, willowleaf) which can transform the bait entirely. Just be aware the quick change clevis takes a bit more speed to get the blade turning than the standard metal clevis.
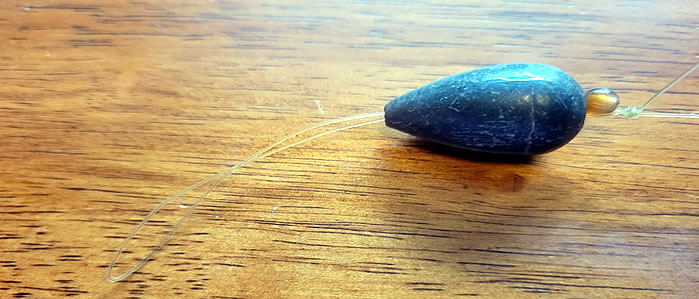
 With weapons, you will use an egg sinker. Your main line will be terminated with a small snap-swivel, and the end of the weapon will be tied into a loop along with a bead. Simply slide the loop through the hole in the egg sinker and then clip the line in the snap on the end of your main line. (Pictured below,) when you want to change the weight just unclip the snap, trade out the weight and you’re on your way.
They to are not without flaws. They tend to tangle around themselves more often, especially for less experienced anglers. They are usually tied up with a monofilament line. The constant spinning of the clevis on the line can cause them to fail. Mono also breaks down when exposed to sunlight.
I didn’t have a weapon laying around so I used an old harness and tied a loop with a bead, you get the idea.
One mistake I see people make very often is putting way too much bait on the hook. A big balled-up bunch of nightcrawler can cause the bait to not sink as fast as it should, and hinder the action of the bait as it’s being used. It’s not the bigger the gob, the better the job as some might think.
What you want to do is start with either end of a nightcrawler and thread it onto the hook. You want to cover the straight shank of the hook from the eyelet to the bend. Once you have enough worm on the hook to cover the straight shank, poke the tip hook out and slide it up the hook to the eyelet leaving the bend exposed. Leave around a 2-inch tail off the back of the hook. This will allow the worm to kick and have a swimming action as the blade of your lure thumps and vibrates. It should take about half of a night crawler.
Hopefully this is enough information to help you get started with cast and drift fishing. Please feel free to drop us a note with a comment. As always, if you want to go out and try this technique first-hand, we would be happy to take you on the water.
Book a trip now with a simple call or text to 330-309-5734.
Thanks,
Captain Tom Ullum
330-309-5734
Lake Erie Charter Service, LLC


